Building a Wookiee
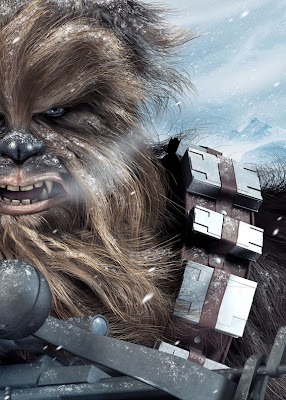
Here's a brief rundown from start to finish on how I created my illustration of Chewbacca using Cinema 4D R10, Zbrush and Photoshop. Some steps are more in-depth than others, and I won't be going into too much detail with the construction of various elements in Cinema 4D but you will see a step-by-step of the process starting from the initial roughs to the finished piece.
1. ROUGH IDEAS
The brief for this job was to illustrate any Star Wars character I wished (preferably a goodie, as most of the other artists participating were illustrating the bad guys). A Chewbacca portrait was suggested by the client, done in a similar vein to my Thing piece (see my 3D art gallery). This seemed like a fun and challenging direction to go. I can't say that Chewie is one of my favourite Star Wars characters, but the personal challenge was there to create something really cool and ideas were already starting to form in my mind.
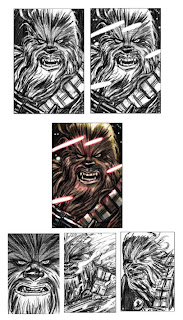
I submitted some rough designs, the colour version in the middle being my first preference. I liked the expression and the laser fire created a good opportunity for some dramatic lighting.
2. FINAL COLOUR ROUGH
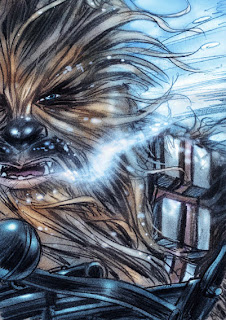
They came back to me with a preference for the unique cropping of the Hoth scene, so the next step was to do a more refined colour rough for George Lucas to sign off on.
3. DECISIONS DECISIONS
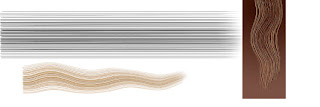
Once it was approved I had to decide how I was going to approach it. A 3D piece was originally discussed but my lack of knowledge in modelling with hair and the very tight deadline (less than a week) had me going down the road of a 2D digital piece done in a similar style to my MAD covers. But I couldn't shake the image of how great it could look if I made the extra effort of modelling it in 3D. So with that crazy decision and next to no knowledge of how I was going to create this 'walking carpet', I nervously stepped back into the realm of 3D.
Below- Abandoned experiments with hair creation in Photoshop.
4. CREATING THE HEAD
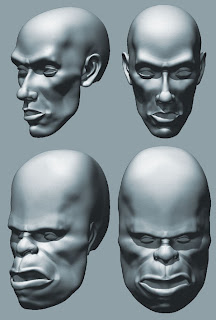
So after promising to get my head examined after this was all over, I began the 3d modelling process. I used a human head which I had previously modelled in Zbrush. I've also used this head in various other pieces in the past, such as the Pinhead, Warrior and Gnome Fisherman illustrations (see my 3D art gallery). Using photo reference of Chewie as a guide, I deformed, pushed and pulled the head in Zbrush, reshaping it to give it more Wookiee proportions. Also a quick texture was painted in Zbrush using Projection Master.
Below is a comparison of the original human head and the reshaped Wookiee head.
5. ADDING HAIR
This was the most stressful part of the whole job. Even though I'd used Cinema 4D a handful of times for various non-hairy projects, I'd never fully explored their hair creation plugin. Initially I thought it would just be a case of covering Chewie's whole head with one large mass of hair, then styling various sections to create the wookie's unique hairdo. WRONG!
I discovered I practically needed a hairdressing degree to work out the proper way to get it done. My own hair was getting greyer by the minute from the stress. The deadline was fast approaching and I was facing the frustrating prospect of having to dump everything and start all over again in 2D.
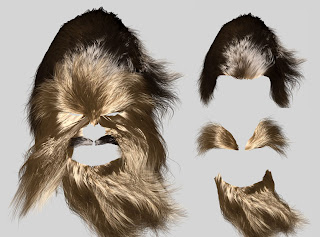
After a brief panic attack, I knuckled down to try and teach myself how to do it properly. I studied the photographs of Chewbacca, noting the different hair masses which made up his hairstyle. There ended up being about ten different sections of hair which had to be applied. I added the separate hair masses to the head mesh and then using gravity, styling, brushing, cutting and a virtual wind machine I made the hair do what I wanted. Not as easy as I make it sound, there were a lot of false starts and redos but I eventually got to a stage I was happy with. By the end of that, doing the torso with one large mass of hair was a walk in the park.
Here's the completed hair and also some of the individual sections.
6. PROPS, BITS AND BOBS
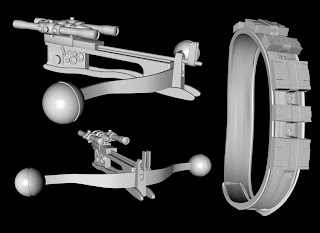
Now came time to add the eyeball, teeth, tongue, his bowcaster and his bandolier.
The eyeball was easy enough. A sphere with just a slight bulge for the iris was added. I could have taken the time to build a transparent lens on top of the sphere to create more accurate refractions and reflections on the eyeball, but considering that it would be mostly covered by hair and shadows and the lack of time, I decided against it.
The teeth were recycled from my previous projects. The main change was to just elongate the canines.
The Bowcaster was built from scratch in Cinema 4D, unfortunately I went a bit overboard and half the fine details I created, were cut off by the angle and the cropping of the final piece.
The Bandolier was fun to make. Gravity was used to form the main belt around Chewie's body and the small straps on the ammunition. The ammunition was just resized and reused across the belt. Minimum effort for maximum results. Things were looking up.
7. LIGHTS, CAMERAS...
Setting the camera was a bit tricky. For some reason I just couldn't get the perspective right and the camera was giving me a fish-eye lens effect where the spheres distorted into ovals. Turns out I was just pressing a wrong button or something. That's what happens when you learn as you go, I guess.
Originally with the lighting I was going to create an illuminated floor which would emulate the glare you get from snow-covered ground, but this just lit the face up way too much. I ended up using three lights, one for the sun, one as reflected light and one as underlighting to light up Chewie's eye area.
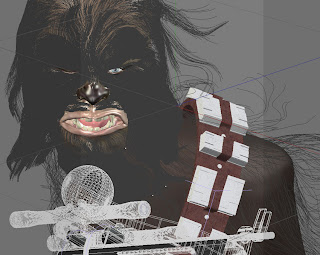
Here's the whole wireframe setup before rendering. As you can see the light grey rectangular area in the middle is the camera area, and everything outside of that looks pretty crappy. If you rotated the whole pic and viewed it from a slightly different angle, it would look terrible. Ironically this 3D piece was only ever going to work from one 2D viewpoint. No use building stuff that isn't going to be seen, right?
8. RENDER!
After a few test renders to make sure everything was working the way it was supposed to, I rendered it out at A2 which took waaaay too long for someone with an ultra short deadline. I was eager to get it into Photoshop to wrap things up.
The eye turned out a bit milky, but that was due to the eyeball being luminated to help it pop out of the shadows. Also there were heaps of stray hairs unnaturally intersecting objects which needed erasing. Below is the untouched render from Cinema 4D.
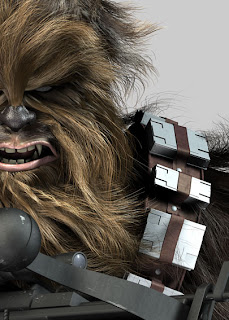
9. IT'S SNOWING!
In Photoshop, I fixed any mistakes, overlayed more textures onto the skin and lips and did some general brightening and colour adjustment. Now it was time to add the snow.
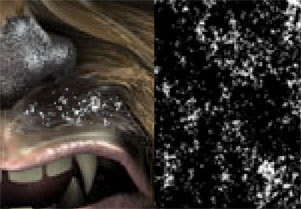
I wasn't too sure how to go about this. Eventually I came up with a very simple method. I found some hi-res textures of rusting metal and textured paper. In Photoshop I desaturated the image and bumped up the contrast until it was almost pure black and white. Then using the cloning tool with the texture on a separate layer, I painted the white clumps of texture onto another layer (which was set to 'Lighten') and this ended up being a pretty convincing snow texture.
Finally the background was added. Since the Cinema 4D render had an Alpha mask included in the Channels, it was very easy to separate the main image from the blank background. The mountains were painted in Photoshop using photo reference and the snowstorm was basically clumps of motion-blurred noise.
As a final touch, noise was added to the whole picture to reduce the digital look and to give the piece a bit more texture.
I hope this rundown was helpful and insightful. If there are any areas I've missed or you want discussed in more depth, leave a comment and I'll try to answer your questions.
Thanks for reading.


17 Comments:
wow! you work well under pressure:P
That's amazing!
i'm speechless.
Wonderful step by step description for a wonderful image... I still will not able to do it, but this is an interesting read :)
I've just started learning this software to enhance my folio, great to see this stuff can work so well. Keep up this great work Chris, it's very appreciated.
Love the final piece, but I'm really atracted to the final color rough more.
Thanks everyone!
Dominic- Yeah it's hard translating a spontaneous sketch into the meticulous, premeditated world of 3D art. You're bound to lose something, but hopefully you gain something too.
Thanks Chris, amazing step by step!
great step by step man
i love the hair u made and the entire i am angry in the snow look on his face lol
great job
Great work! It's good to see all the workarounds to get the job done. I think there are a lot of people that are determined to do things a certain way every single time but that just doesn't work with deadlines.
Good work! Glad Mr. Lucas liked it :)
I've tooled around with Zbrush enough to be impressed with people who know how to use it like that. Great work.
Kudos for you, having the guts to start it in 3d when you did a good 2d project just lets me speechless. Good job.
Thankyou everyone for the encouraging comments. Very appreciated.
Hey Chris, this just happens to have been one of the pieces that Matt (from Drawing Book) used when he came to give the talk. Did i understand you right that the file that you created in Cinema 4D came with a built in mask? We were just learning about masks in our photoshop class and how powerful they are (we are doing matte painting at the moment) and this sounds like a sanity saver with a picture with as much hair as that.
Awesome job, Matt could not say enough about you as an artist and person too! :)
Hey PJ
When I rendered the Chewbacca in Cinema4D, I selected an option for it to include an alpha channel when saving the render as a layered Photoshop file. So when you open it in Photoshop you can load the channel/mask and easily separate your rendered object, hair and all, from the background. I'd say most high end 3d programs have this option. Hope that helps.
So where did Matt give a talk?
Sorry Chris i forgot to check the 'email replies' box and forgot to come anc check for your reply for a while.
Yeah dude that totally answers my question and now has me salivating to try it out. :) At the end of the year when the portfolio thing and the diploma is over and done with.
Matt came to Enmore Design Centre where i am doing the Diploma in Design and Illustration.
Thanks again for your time Chris and sorry it took so long for me to come back. :)
Hi Cris,
I liked a lot your Chewbacca image, however I do not have any painting skills either in photoshop or real-life. In this case, I would like to know if you would mind giving me a high definition version of this image for the confection of a wall frame.
Thanks in advance,
Esquirio
Post a Comment
<< Home